KVM Implementation with Proxmox
KVM Server implementation

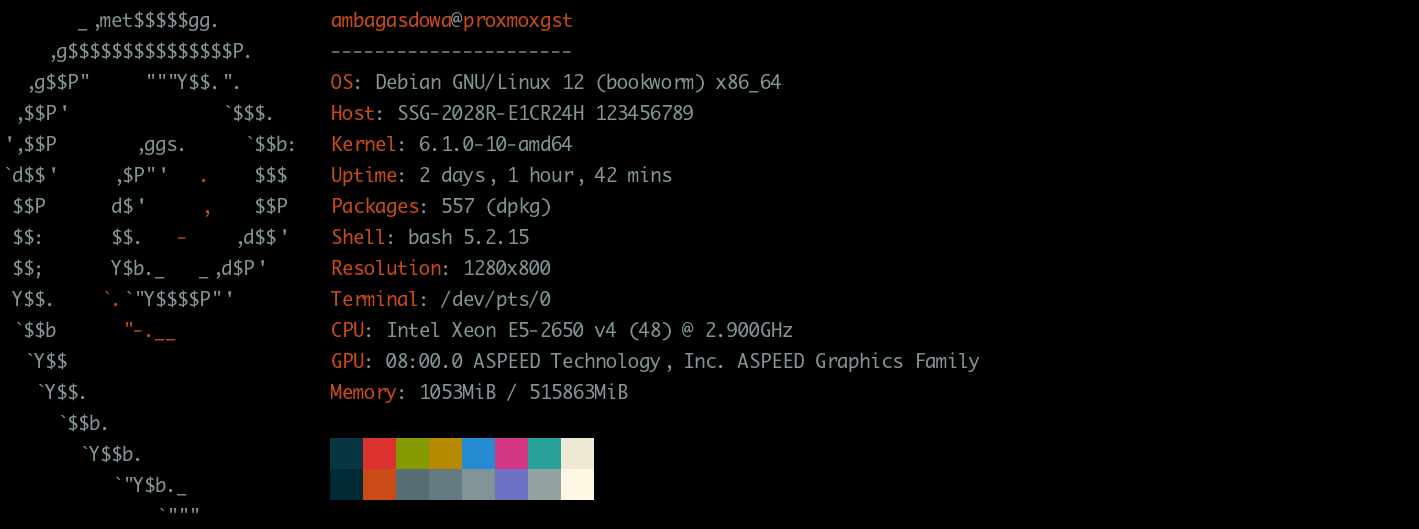
Specifications
Checking the capabilities of the server
1 | |
Virtualizations capabilities
# dmesg | grep -e DMAR -e IOMMU -e AMD-Vi
Network Configuration
Note
For Configure a Virtual Private Network node refer to VPN Config
For Configure a Wireless interface refer to Wpa Supplicant
Bridged networking aka: “shared physical device”
Install bridge utils on debian
sudo apt install bridge-utils
Config an interface as bridge to guest machines
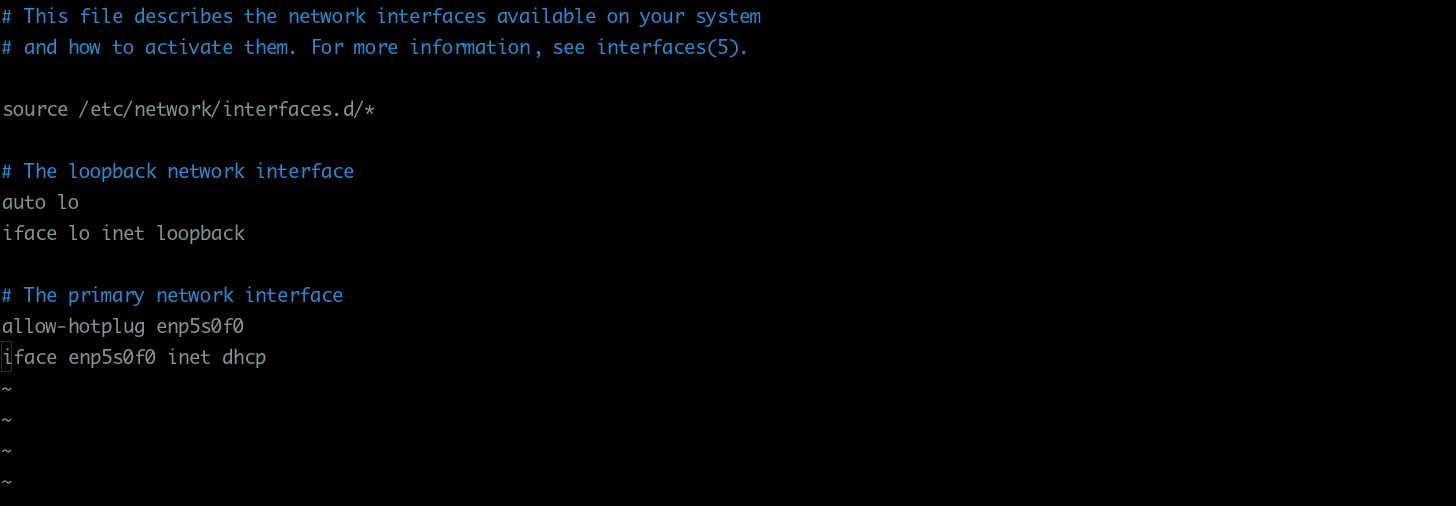
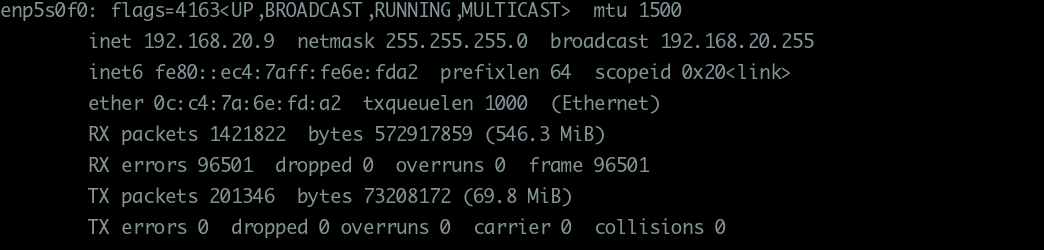
How to view the current configuration of the interfaces
With ip command
1 | |

With ifconfig
1 | |
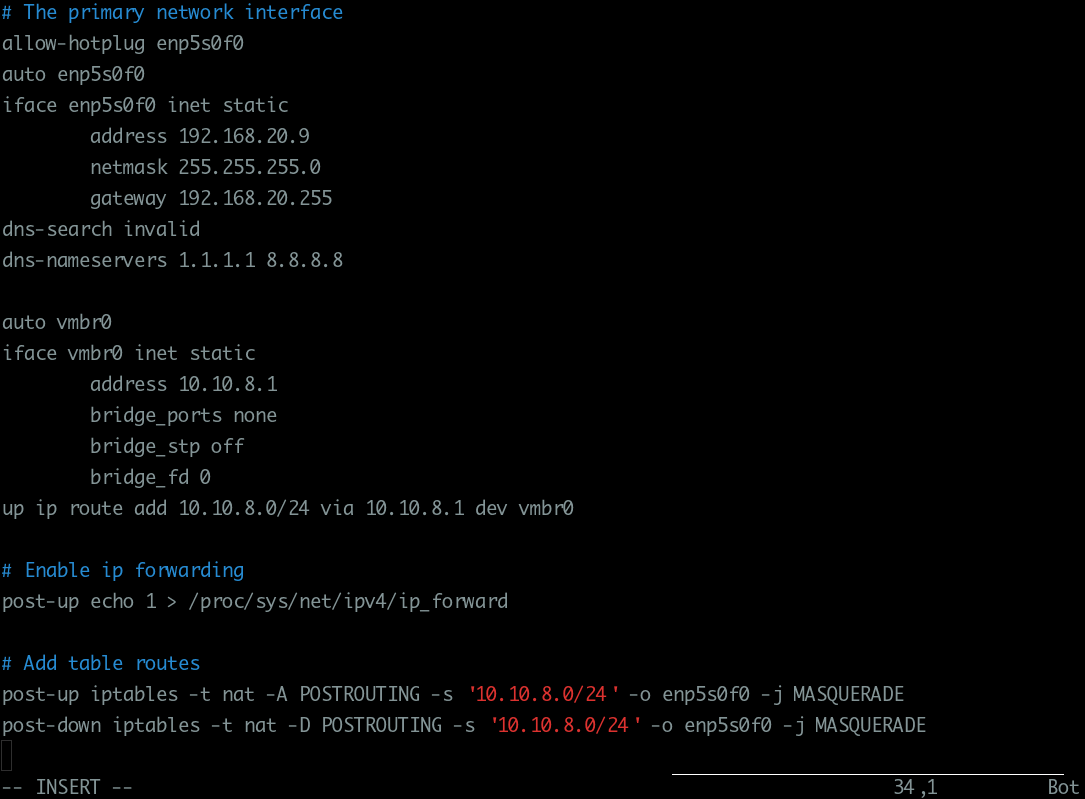
Add bridge configuration to interfaces file
1 2 3 4 5 6 7 8 9 10 11 12 13 | |
1 2 3 4 5 6 7 | |
1 2 | |
1 2 3 | |
Enabling IOMMU
Do I have iommu ?
1 | |
- How to enable IOMMU on Intel and AMD product?
Go to BIOS screen and find the
VT-dorIOMMUfrom the NorthBridge Configuration and change that setting to “Enabled”, and save it. In case of CentOS6.x and RedHat6.x, you have to addintel_iommu=onoramd_iommu=onto kernel option too.
Note
Ensure that AMD-Vi/Intel VT-d is supported by the CPU and enabled in the BIOS settings.
Both normally show up alongside other CPU features (meaning they could be in an overclocking-related menu)
either with their actual names VT-d or AMD-Vi or in more ambiguous terms such as
“Virtualization technology”, which may or may not be explained in the manual.
Manually enable IOMMU support by setting the correct kernel parameter depending on the type of CPU in use:
Success
For Intel CPUs (VT-d) set intel_iommu=on. Since the kernel config option CONFIG_INTEL_IOMMU_DEFAULT_ON is not set in linux. For AMD CPUs (AMD-Vi), it is on if kernel detects IOMMU hardware support from BIOS.
You should also append the iommu=pt parameter. This will prevent Linux from touching devices which cannot be passed through.
Check Grub Parameter
For check if iommu is enable in grub kernel option
1 2 3 | |
Add the parameter in /etc/default/grub
1 2 3 4 5 6 7 8 9 10 11 | |
Rewrite the Bios
Rewrite Bios Option from kernel start¶# Add : nox2apic intremap=no_x2apic_optout
GRUB_CMDLINE_LINUX_DEFAULT="quiet intel_iommu=on iommu=pt nox2apic intremap=no_x2apic_optout"
After that update grub:
sudo update-grub2
Modules Enable
/etc/modules¶1 2 3 4 | |
After changing anything modules related, you need to refresh your initramfs. On {pve} this can be done by executing:
# update-initramfs -u -k all
Finish Configuration
Finally reboot to bring the changes into effect and check that it is indeed enabled.
# dmesg | grep -e DMAR -e IOMMU -e AMD-Vi
Verify IOMMU interrupt remapping is enabled
It is not possible to use PCI passthrough without interrupt remapping. Device assignment will fail with ‘Failed to assign device “[device name]”: Operation not permitted’ or ‘Interrupt Remapping hardware not found, passing devices to unprivileged domains is insecure.’.
All systems using an Intel processor and chipset that have support for Intel Virtualization Technology for Directed I/O (VT-d), but do not have support for interrupt remapping will see such an error. Interrupt remapping support is provided in newer processors and chipsets (both AMD and Intel).
To identify if your system has support for interrupt remapping:
dmesg | grep 'remapping'

[    0.179058] DMAR-IR: Queued invalidation will be enabled to support x2apic and Intr-remapping.
[    0.179350] DMAR-IR: Enabled IRQ remapping in x2apic mode
If you see one of the following lines:
AMD-Vi: Interrupt remapping enabledDMAR-IR: Enabled IRQ remapping in x2apic mode(‘x2apic’ can be different on old CPUs, but should still work)
then remapping is supported.
Testing the Configuration under Linux
The following instructions will explain how to test if the CPU supports VT-x and, if that is the case, how to test if the BIOS settings permit this feature to be used.
Does the CPU support VT-x?
On a Linux system, you can test if the CPUs will support VT-x with the help of the /proc/cpuinfo utility. If the vmx setting is listed among the flags, the CPU will support VT-x, in principle:[2]
root@grml~# cat /proc/cpuinfo
processor: 0
vendor_id: GenuineIntel
cpu family: 6
model 15:
model name: Intel(R) Xeon(R) CPU            5110  @ 1.60GHz
stepping: 6
cpu MHz: 1595.896
cache size: 4096 KB
physical id: 0
siblings: 2
core id: 0
cpu cores: 2
apicid: 0
initial apicid: 0
fpu: yes
fpu_exception: yes
cpuid level: 10
wp: yes
flags: fpu vme de pse tsc msr pae mce cx8 apic sep mtrr pge
mca cmov pat pse36 clflush dts acpi mmx fxsr sse sse2 ss ht tm pbe syscall
nx lm constant_tsc arch_perfmon pebs bts rep_good pni dtes64 monitor ds_cpl
vmx tm2 ssse3 cx16 xtpr pdcm dca lahf_lm tpr_shadow
bogomips: 3193.78
clflush size: 64
cache_alignment: 64
address sizes: 36 bits physical, 48 bits virtual
power management:
[...]
Do the BIOS Settings permit VT-x usage?
If the BIOS will permit the usage of VT-x can be determined with the help of the rdmsr (read msr) utility from the msr-tools tool package[3] MSR stands for machine-specific register, although sometimes model-specific register is used.[4] MSRs are used to set specific values for the hardware in use or to transfer values between the BIOS and the kernel.
The VT-x lock function is stored in the IA32_FEATURE_CONTROL machine-specific register (MSR address 0x3a).[5] This MSR contains the following three bits:[6]
Bit 0: lock bit
Bit 1: activate VMXON in SMX mode
Bit 2: activate VMXON outside of SMX mode
The BIOS must set Bits 1 and 2, or all three bits (including Bit 0) so that VT-x support will be enabled.
The Linux Live CD from grml 64 for May 2009 will be used in this
example. The msr-tools will be installed by means of the
apt-get update and subsequent apt-get install msr-tools
commands. So that rdmsr can access the MSRs, the msr kernel module will
have to be installed.
Example 1: Deactivating Intel VT-x in the BIOS
If Intel VT-x has been deactivated in the BIOS (or the server was not
turned off and back on after the setting was activated), the
rdmsr 0x3a command will return 1 (meaning that only Bit 0 has
been set).
root@grml ~ # modinfo msr
filename:       /lib/modules/2.6.28-grml64/kernel/arch/x86/kernel/msr.ko
license:        GPL
description:    x86 generic MSR driver
author:         H. Peter Anvin <hpa@zytor.com>
srcversion:     645F15590C9CD893B156AD6
depends:
vermagic:       2.6.28-grml64 SMP preempt mod_unload
root@grml ~ # modprobe msr
root@grml ~ # rdmsr 0x3a
1
root@grml ~ #
Example 2: Activating Intel VT-x in the BIOS
With the example server (an Intel SR2500), the rdmsr 0x3a command
returns 5, if Intel VT-x has been activated in the BIOS (Bits 0 and
2 have therefore been set).
root@grml ~ # modinfo msr
filename:       /lib/modules/2.6.28-grml64/kernel/arch/x86/kernel/msr.ko
license:        GPL
description:    x86 generic MSR driver
author:         H. Peter Anvin <hpa@zytor.com>
srcversion:     645F15590C9CD893B156AD6
depends:
vermagic:       2.6.28-grml64 SMP preempt mod_unload
root@grml ~ # modprobe msr
root@grml ~ # rdmsr 0x3a
5
root@grml ~ #
IOMMU supported but deactivated

IOMMU Full Activated

KVM Installation
It is possible to install only QEMU and KVM for a very minimal setup, but most users will also want libvirt for convenient configuration and management of the virtual machines (libvirt-daemon-system - libvirt, virt-manager - a GUI for libvirt). Typically a user should install:
$ sudo apt install qemu-system libvirt-daemon-system
When installing on a server, you can add the –no-install-recommends apt option, to prevent the installation of extraneous graphical packages:
$ sudo apt install –no-install-recommends qemu-system libvirt-clients libvirt-daemon-system
The libvirtd daemon (in libvirt-daemon on most architectures, and in libvirt-bin on others) will start automatically at boot time and load the appropriate KVM modules, kvm-amd or kvm-intel, which are shipped with the Linux kernel Debian package. If you intend to create Virtual Machines (VMs) from the command-line, install virtinst.
In order to manage virtual machines as a regular user, that user needs to be added to the libvirt group:
# adduser libvirt
You should then be able to list your domains, that is virtual machines managed by libvirt:
# virsh list –all
User-specific and system-wide VMs
By default, if virsh is run as a normal user it will connect to libvirt using qemu:///session URI string. This URI allows virsh to manage only the set of VMs belonging to this particular user. To manage the system set of VMs (i.e., VMs belonging to root) virsh should be run as root or with qemu:///system URI:
$ virsh –connect qemu:///system list –all
To avoid having to use the –connect flag on every command, the URI string can be set in the LIBVIRT_DEFAULT_URI environment variable:
$ export LIBVIRT_DEFAULT_URI=‘qemu:///system’
FileSystem Management
sudo apt install guestfs-tools libguestfs-gfs2 libguestfs-jfs libguestfs-nilfs libguestfs-rescue libguestfs-rsync libguestfs-zfs quota nfs-kernel-server
Storage pools
A pool is a location where storage volumes can be kept. What libvirt defines as volumes others may define as “virtual disks” or “virtual machine images”. Pool locations may be a directory, a network filesystem, or partition (this includes a LVM). Pools can be toggled active or inactive and allocated for space.
On the system-level, /var/lib/libvirt/images/ will be activated by
default; on a user-session, virt-manager creates
$XDG_DATA_HOME/images.
Print active and inactive storage pools:
$ virsh pool-list –all
Create a new pool using virsh
If one wanted to add a storage pool, here are examples of the command form, adding a directory, and adding a LVM volume:
$ virsh pool-define-as name type [source-host] [source-path] [source-dev] [source-name] [] [–source-format format] $ virsh pool-define-as poolname dir - - - - /home/username/.local/libvirt/images $ virsh pool-define-as poolname fs - - /dev/vg0/images - mntpoint
The above command defines the information for the pool, to build it:
$ virsh pool-build poolname $ virsh pool-start poolname $ virsh pool-autostart poolname
To remove it:
$ virsh pool-undefine poolname
Tip: For LVM storage pools:
It is a good practice to dedicate a volume group to the storage pool only.
Choose a LVM volume group that differs from the pool name, otherwise when the storage pool is deleted the LVM group will be too.
Storage volumes
Once the pool has been created, volumes can be created inside the pool. If building a new domain (virtual machine), this step can be skipped as a volume can be created in the domain creation process.
Create a new volume with virsh
Create volume, list volumes, resize, and delete:
$ virsh vol-create-as poolname volumename 10GiB –format aw|bochs|raw|qcow|qcow2|vmdk $ virsh vol-upload –pool poolname volumename volumepath $ virsh vol-list poolname $ virsh vol-resize –pool poolname volumename 12GiB $ virsh vol-delete –pool poolname volumename $ virsh vol-dumpxml –pool poolname volumename # for details.
Session Configurations
Bridged networking using qemu-bridge-helper
This method does not require a start-up script and readily accommodates
multiple taps and multiple bridges. It uses
/usr/lib/qemu/qemu-bridge-helper binary, which allows creating tap
devices on an existing bridge.
Tip:
See Network bridge for information on creating bridge.
See https://wiki.qemu.org/Features/HelperNetworking for more information on QEMU’s network helper.
First, create a configuration file containing the names of all bridges to be used by QEMU:
/etc/qemu/bridge.conf
allow br0 allow br1 …
Make sure /etc/qemu/ has 755
permissions. QEMU
issues and GNS3
issues
may arise if this is not the case.
Bridge Error
Error
Starting install...
ERROR    /usr/lib/qemu/qemu-bridge-helper --br=vmbr0 --fd=33:
failed to communicate with bridge helper: stderr=failed to create tun device:
Operation not permitted: Transport endpoint is not connected
Domain installation does not appear to have been successful.
chmod u+s /usr/libexec/qemu-bridge-helper
chmod u+s /usr/lib/qemu/qemu-bridge-helper